Timing is everything… or so they say.
Just like comedians, musicians must master the art of delivery. This article presents some solutions to developing a sense of beat and rhythm for beginning students, but can also be extended and modified for older beginners or more advanced players. There will be 3 articles in this series based on learning styles. Learning styles are a researched-based methodology of expressive teaching through visual, auditory, and kinesthetic modalities.
Learning styles are all the rage today, but I don’t believe they are an end-all, be-all solution, because students of all ages can benefit from each different type of learning. I recommend trying multiple exercises in different styles, even outside of the conventional modalities! When a student finds success with one exercise don’t give up; pursue avenues for them to practice their skill. Don’t give up once they have achieved their goal!
A few of the ideas presented in this series have been taken from my experience as a Kodaly-inspired teacher. Over the past few years I have tried out different ways to use the Kodaly method in my teaching. In the Kodaly philosophy, being able to demonstrate a steady beat is one factor that determines “readiness” and occurs in early childhood, right before instruction of rhythm and more complex melodic instruction. Readiness is developmental and cannot be forced. Depending on the age of your student, it might be helpful to work on readiness skills without the instrument if they are having difficulty with steady beat.
This series of articles is not meant to be a complete solution, so if you have something to add, please comment below.
Using Visual Manipulatives
For understanding beat, the use of a manipulative is key. A manipulative is exactly what it implies: something that can used, specifically with your hands. The key is that it be something your student can manipulate by themselves, without the aid of the teacher. Learning with manipulatives should be led by the student and assisted by the teacher.
Many teachers assume students have a well defined idea of what the “beat” is in music. I encourage you to help students understand the heart beat concept by having them feel their own pulse, then ask them the characteristics. They may answer “fast” or “slow.” But ultimately the defining characteristic is “steady.”
Exercise no. 1 – For students who cannot hold a steady beat while playing any piece
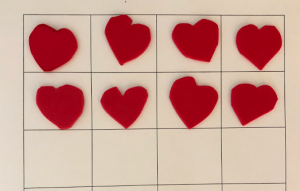
Step 1: Purchase small heart shaped erasers, stickers, candy, or anything that is small enough to have several in a row. I simply cut hearts out of red foam. Try to find the Valentine’s Day bargain bin!
Step 2: Have students identify the beats of a known piece with several heart shaped manipulatives. You could give them a “rubric” that has rows and columns like a grid. This would prepare good phrasing. They (or you) can sing while beats are placed.
Step 3: Have students lay out hearts on their own, and have them check their work by playing and having them point to each heart for the beat. If they do that, have them track with their eyes with the beat and stomp their feet to add a kinesthetic component.
Step 4: Practice with several songs.

Exercise no. 2 – For students who do not understand simple rhythms as related to beat either in a section or throughout a song. Though students might know the technical term “rhythm,” they might need help differentiating rhythm as a division of the beat. This exercise makes them aware of the interconnectedness of the rhythm and beat.
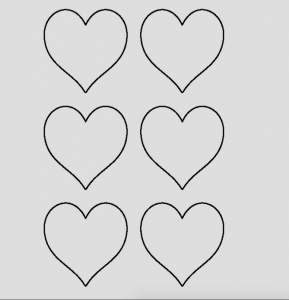
Step 1: Print a grid of hearts (see below) and have students practice pointing while singing or listening to their piece of music. Once they can do this on their own repeatedly proceed to step two.
Step 2: Have students identify how many sounds (rhythm) per beat. Inside each heart place how many sounds they hear per beat. If you have a rhythm such as an eighth note and two sixteenths, you can place them spatially together. For half notes, they can leave the heart blank or put an arrow extending across two hearts.
Step 3: Have students say numbers to melody while keeping a steady beat. For more complicated rhythms you can use rhythm syllables.

Exercise no. 3 – For understanding rubato, ritardandos, and accelerations
Teaching tempo alterations can be challenging. Often teachers demonstrate what they want their students to do by playing but that often isn’t enough. I find students really need another type of practice. Using visual manipulatives can help students grasp tempo changes in a different capacity.
Step 1: Place hearts as in exercise 1 and 2. Have students track beat with no alterations and hum or sing.
Step 2: Depending on the type of change desired (ritardando, accelerando, etc.) space the hearts closer together or further apart. To work on the concept of rubato, simply adjust hearts as needed. Using spatial reasoning can solidify a student’s demonstration of tempo!


Stay tuned for Kinesthetic and Aural ways to develop your student’s great sense of time!


[…] methods teaching, I started applying the method to private lessons. If you have read my column, “Teaching with Kodaly,” I write about my experience. I also researched for a beginning flute method based on the […]
[…] This article is one in a three part series that focuses on great “timing,” specifically ways to develop a sense of beat and rhythm for beginning students, older beginners or even advanced players. Since most beginning flute methods introduce reading from the very beginning, in the first article of this series I talked about ways to develop great timing with visual manipulatives first. Read the article here. […]