
The position of the pelvis is not generally addressed at all in traditional flute pedagogy. The more I work as a manual therapist and movement educator, the more I am convinced that this area of the body is of vital importance to overall quality of movement in general, as well as in specific tasks such as flute playing. Often there is a real disconnection between the legs and upper body. If we want to truly own our legs and our connection to the ground, then we’ve got to know what’s going on with our pelvis.
Students frequently report that once they get their pelvis sorted out, something amazing happens with their breathing and their arm movements. All of a sudden, everything is working better, but they don’t understand exactly why. This is the first article in series that will explain the power of the pelvis.
Anatomy of the Pelvis
Disclaimer – I’m presenting information about the bony structure of the pelvis only. Its reproductive and urinary functions are not relevant to this discussion. In future articles, there will be information about musculature that attaches to the pelvis.
The pelvis has two halves (a right and left), which are each made up of three bones called the ilium, ischium and pubis. These bones are separate when we are born and become fully fused in the late teens. The two halves of the pelvis meet in front at the pubic symphysis, which is a joint made of cartilage. In the back, the two halves of the pelvis attach to the sacrum, the base of the spine, at the sacroiliac (SI) joints. Often, people consider their pelvis to be a fixed entity, like a bowl, that doesn’t allow movement. This is not how it actually works, as there are movement possibilities at the the SI joints and slight movement possibilities at the pubic symphysis in front, especially during pregnancy.
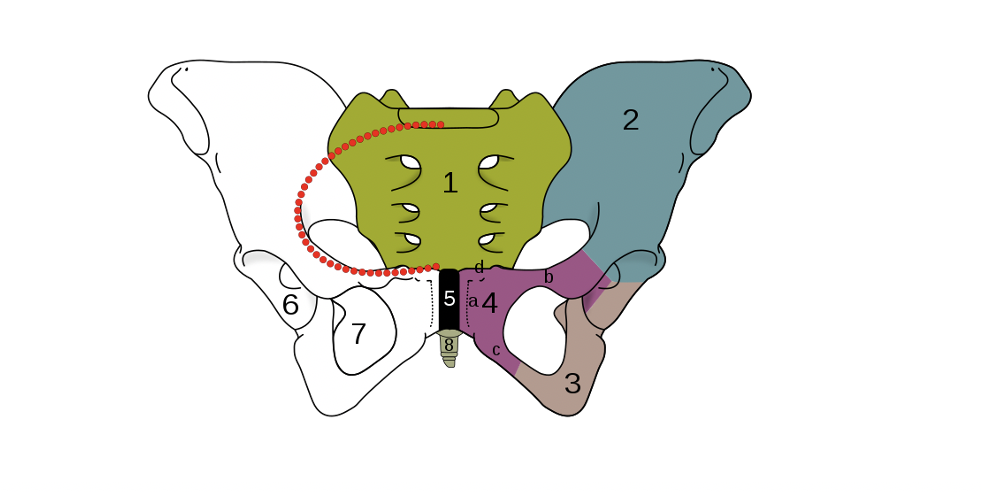
The skeleton of the human pelvis:
2–4. Hip bone (os coxae)
1. Sacrum (os sacrum), 2. Ilium (os ilium), 3. Ischium (os ischii)
4. Pubic bone (os pubis) (4a. corpus, 4b. ramus superior, 4c. ramus inferior, 4d. tuberculum pubicum)
5. Pubic symphysis, 6. Acetabulum (of the hip joint), 7. Foramen obturatum, 8. Coccyx/tailbone (os coccygis)
Dotted. Linea terminalis of the pelvic brim (https://en.wikipedia.org/wiki/Pelvis)
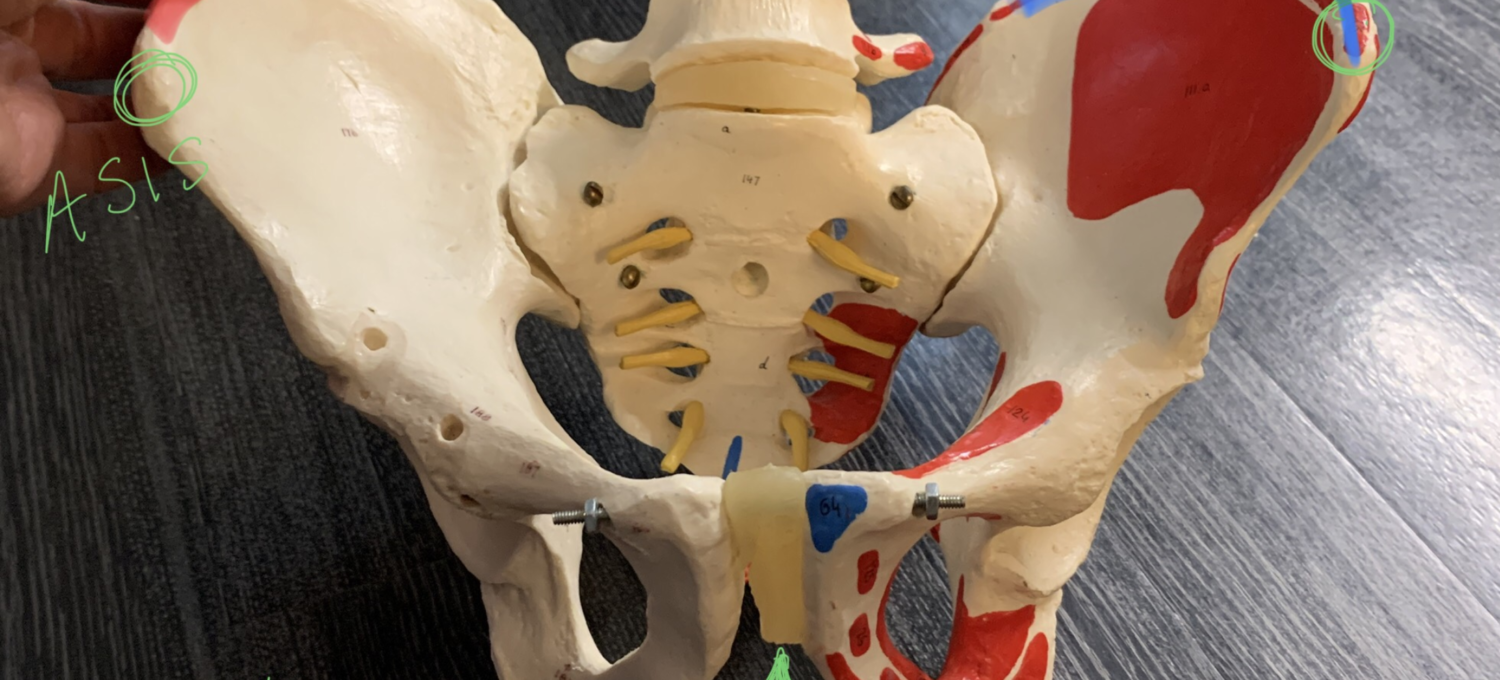
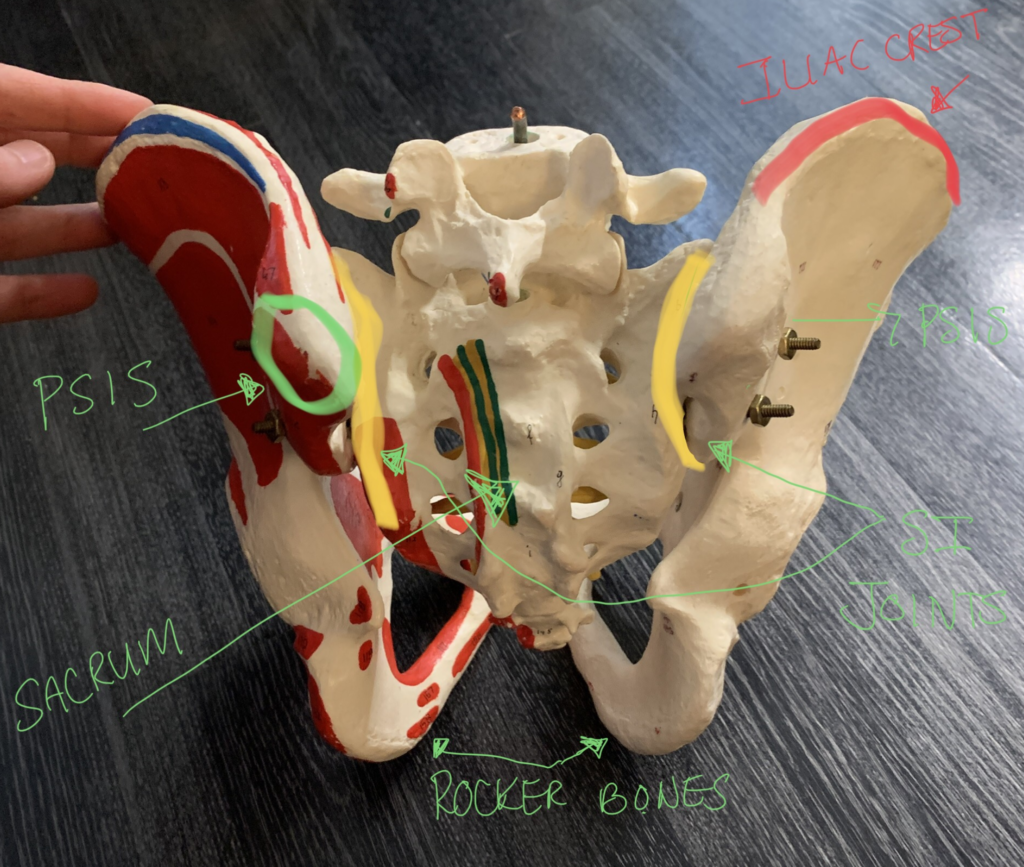
Bony Landmarks
The best way to find bony landmarks of your pelvis is through palpation, which simply means to examine by touch. If you were given the instruction “Simon Says put your hands on your hips,” most often people are touching their iliac crests. This is the curved bony ridge that’s easily accessible along your the sides of your pelvis. This is definitely pelvis, not your hip joints! If you follow the iliac crest to the front, it end at a bony prominence called the anterior superior iliac spine (ASIS). You have one on each side, right and left. In the privacy of your own home, you can clearly feel your pubic bones in front, as well as the pubic symphysis in between which has a different texture to it as it’s cartilage and not bone.
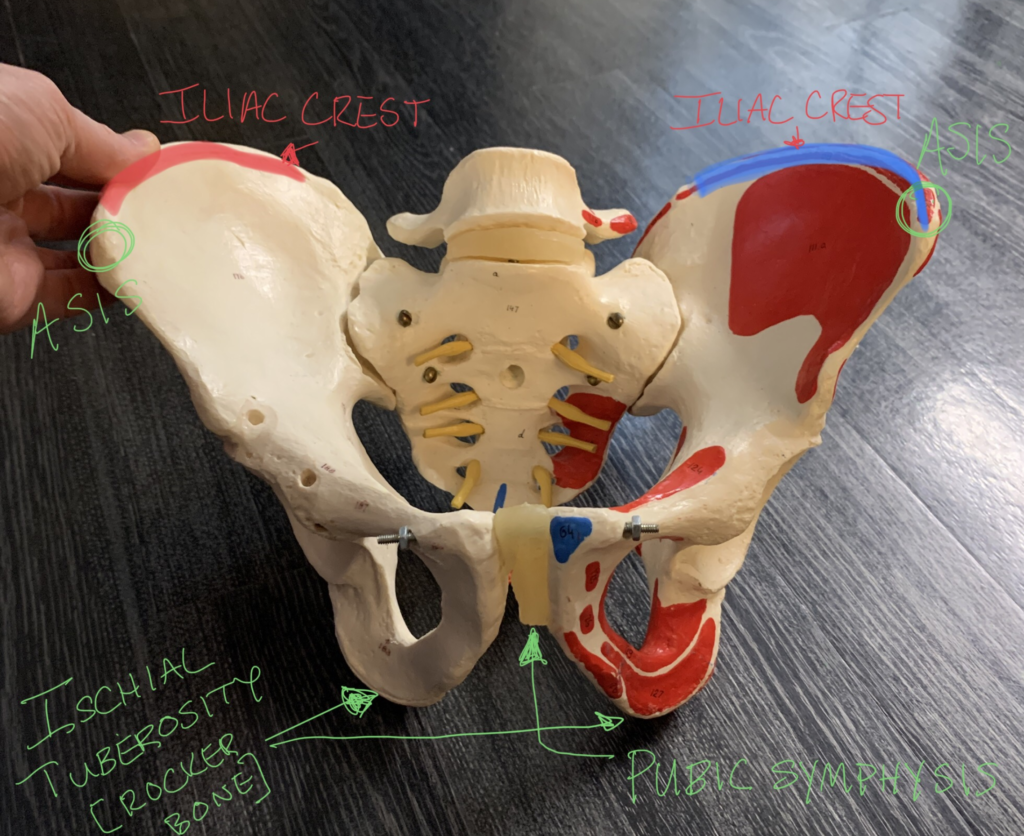
The two labeled images in this section show bony landmarks on a male pelvis.
If you trace the iliac crest to the back, you’ll find another bony prominence called the posterior superior iliac spine (PSIS). Again you have two, one on each side. The area in between the PSIS points in back is your sacrum. It is shaped like a triangle pointing down. Your SI joints can be felt as lines of bumps between the sacrum and pelvis. When sitting, the bottom part of your pelvis that is making contact with the chair is the ischial tuberosities. You have two – one on each side. I call them rocker bones, as they are shaped like a rocking chair. They are not parallel to each other, rather they are closer together in the front and wider at the back, more like a triangle. If you slide your hands under your bottom when sitting, you should be able to easily feel your rocker bones.
Shape Differences
When looking at anatomical models or images, it’s important to remember that these are all averages of what real people look like. Nobody looks exactly like the photo or the model. There are two distinct shapes for the pelvis and they have been named as male and female. The female version is wider and has a more bowl-shaped slope to the inside, as well as a wider distance between the ischial tuberosities, and is clearly designed for pregnancy and childbirth. The male version is taller from top to bottom and has more steeply sloped sides.
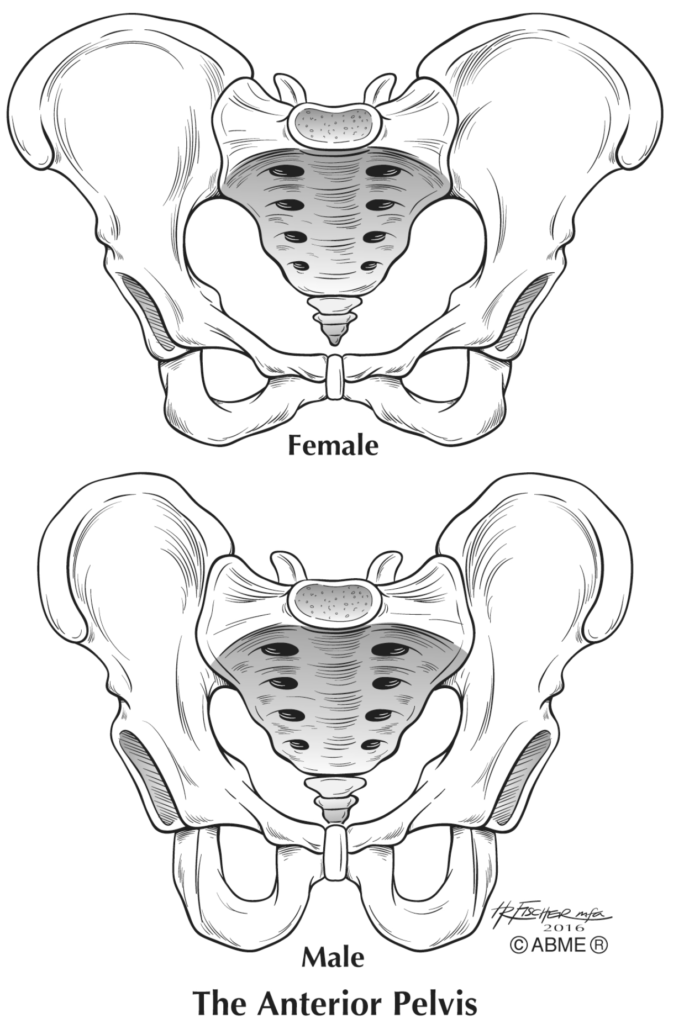
When I started learning about body mapping, I was using images of a male pelvis. Most skeletal models have a male pelvis and I had to pay extra to get an anatomical model of spine with a female pelvis. I didn’t clearly map my own pelvis until after the birth of my first child. So, everyone has to map what their own pelvis is like. Click here https://www.registerednursern.com/male-vs-female-pelvis/) for an article that provides more details about specific differences.
So What? How is this important for flutists?
While seated in a chair with feet flat on the floor, rock slowly forward and back on your rocker bones, the bottom of your pelvis which is contacting the seat of the chair. A good place of dynamic balance is to stop when you feel that your rocker bones are going straight down into the chair. This may be more forward that you usually sit. It’s very common to be rolled back too far – this results in a C-shaped slumping posture. Most chairs, including seats in cars and airplanes have a curved surface which automatically puts us in this position. People tend to not sit too far forward on rocker bones because we’d fall forward and out of the chair.
Global Connection Experiment #1:
Step 1: Sit in a chair with your feet flat on the floor. Start with balancing your head as well as you can. If you don’t know what this means, click here (https://thefluteexaminer.com/pain-in-the-neck/). Then find balance over your rocker bones. Inhale while lifting your arms up to flute playing position (without a flute) and then exhale and bring your arms back down. Do this a few times and notice what’s happening with the quality of your breathing.
Step 2: This time, rock back too far on your rocker bones. This is the lovely C-shaped posture. You will probably notice that your head goes off balance (forward in space and chin up/base of skull down). Inhale when bringing arms up and exhale when bringing arms down. Do you notice anything? Most people report that they have much less air in the unbalanced posture and/or have to work much harder to get the air in.
Conclusion: Something about the position of the pelvis is impacting the breathing mechanics.
Step 3: Repeat the entire testing procedure, but add some playing this time. I encourage students to do some long tones or slow melodies, as well as some fast scale passages. Notice what you notice about tone quality and finger technique. After experimenting with this, people report that tone quality is much bigger and freer and the fingers seem to work much more quickly and technique is more coordinated in general.
Conclusion: Something about the pelvis is impacting the arm movement.
The next article in this series will be about different types of movement that happen with the pelvis. The knowledge of bony landmarks will be important in understanding what these movements are and noticing what types of movement you are choosing while playing your flute, as well as in your daily life as a human.
[…] is the differences between types of movement that happen at the pelvis. If you haven’t read the first article (https://thefluteexaminer.com/the-importance-of-the-pelvis-part-1/) from our November 2020 issue, […]