

Being a piccolo player during the winter months can be very scary—especially with the weather we have had the past few months. Delicate wooden instruments, lips, and fingers, antagonized by freezing cold weather can cause more than enough stress in any piccolo player’s life. I am always fearful of transporting my beautiful Keefe piccolo to gigs in single digit temperatures ….only to find out that it isn’t much warmer in the hall where I’m performing. Then, I sit down only to realize that my lip has split open, right where I need the most control.
Have you been there before? Here are a couple tips to help with those less-than-perfect situations that come with the winter months.
First, the instrument woes…
1. I know this goes without saying but never leave your instrument in the car. I frequently carry mine into restaurants and stores if the stop is necessary.
2. Keep the piccolo inside the case, inside a case cover, inside of a gig bag and close to your body when it is cold outside and you must travel.
3. NEVER take a wooden instrument out of the case and blow directly into it to warm it up. This may work with metal and composite instruments but the sudden moisture and temperature change in the bore can cause the internal wood fibers to expand faster that the external fibers resulting in a crack.
Keep the instrument close to your body and allow it to warm up slowly. This may mean that you need to get to the gig a little early but it will save you a lot of tears and money in the end.
4. I usually put the headjoint under my arm (this might require some coordination to prevent dropping the headjoint). If there are long rests or if I am doubling in a cold hall I have been known to put the piccolo in my inner tux jacket pocket.
5. Always swab the instrument out thoroughly.
6. At home, I run a humidifier and always put the instrument away when not in use. Even at home, I always follow the advice above for warming up the piccolo in cold weather.
Now, about those lips…
1. I make and use my own all natural lip balm most of the time. I know what is in it and I know it works. When I am without, I use one of the brands of natural lip balms. I will include my recipe below. Waxy lip balms can coat and protect in extreme weather but the lighter lip balms will absorb more easily.
2. When the weather is dry, I make sure to coat my lips with coconut oil, vitamin e oil, or cocoa butter before bed. These oils will absorb and moisturize the skin. My personal preference before bed is cocoa butter. I like the smell and it works really well for me.
3. I try to cover my face when I venture outside, especially if I know I am going to be out for a bit like when I walk the dog. This is when I might consider a waxier lip balm for longer protection.
4. Moisture is your friend.
 My lip balm.
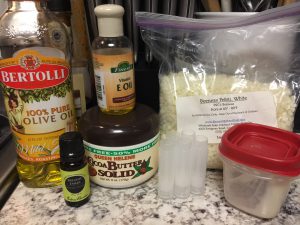
This is just a rough old school method but it works. Why fix it if it ain’t broke? You will need, beeswax pellets, coconut oil or cocoa butter or olive oil or shea butter (or some of each), peppermint essential oil (or one of your choosing), and I usually add a few drops of vitamin e oil. You can use lip balm tubes (easily purchased on Ebay or Amazon) or use one of those tiny Rubbermaid containers that have no other practical use (you can just apply the balm with your finger).
2 tablespoons beeswax pellets
2 tablespoons shea butter or cocoa butter
2 tablespoons coconut oil or olive oil
5-10 drops of vitamin e oil (if you prefer)
10 drops peppermint essential oil (to your own taste so to speak)
Lip Balm Instructions
Place all ingredients (except the essential oils) in a microwave safe container (I use a left over take-out container) Melt beeswax, and other ingredients as you would butter, 15-30 second increments so that they don’t blow up in the microwave (what a mess). Continue to stir between microwave sessions until everything is melted and well blended. Add the essential oils last as the cooking will lessen their presence. Stir in the essential oils. Immediately pour in to balm tubes or small containers as the oils and waxes will begin to solidify.
If you find the lip balm is too loose or oily, reheat and add some more beeswax. On the contrary, if the balm is too stiff, add more of your favorite oil to loosen it up. t is all about your preference so enjoy. Keep the unused portion of the balm in the refrigerator until needed as the natural oils will go rancid over time. That doesn’t mean they are bad, they just won’t have a pleasant odor. This should fill between 10-15 lip balm tubes.
